This is a serial tutorials about learning triton. In this first blogpost, I will introduce you what’s triton, how to install it and a vector-addition example. Enjoy!
What’s Triton
Triton is a programming language and compiler for parallel programming. As the creator stated,
Triton basically aims to be a simpler, open-source version of CUDA-C. Compute kernels are written in a single-threaded C-like language in which statically-shaped arrays are first-class citizen rather than just pointers to contiguous regions of memory.
Consequently, when writing compute kernels with Triton, we don’t need to worry about threading synchronization, shared memory, etc. The Triton compiler handles this automatically.
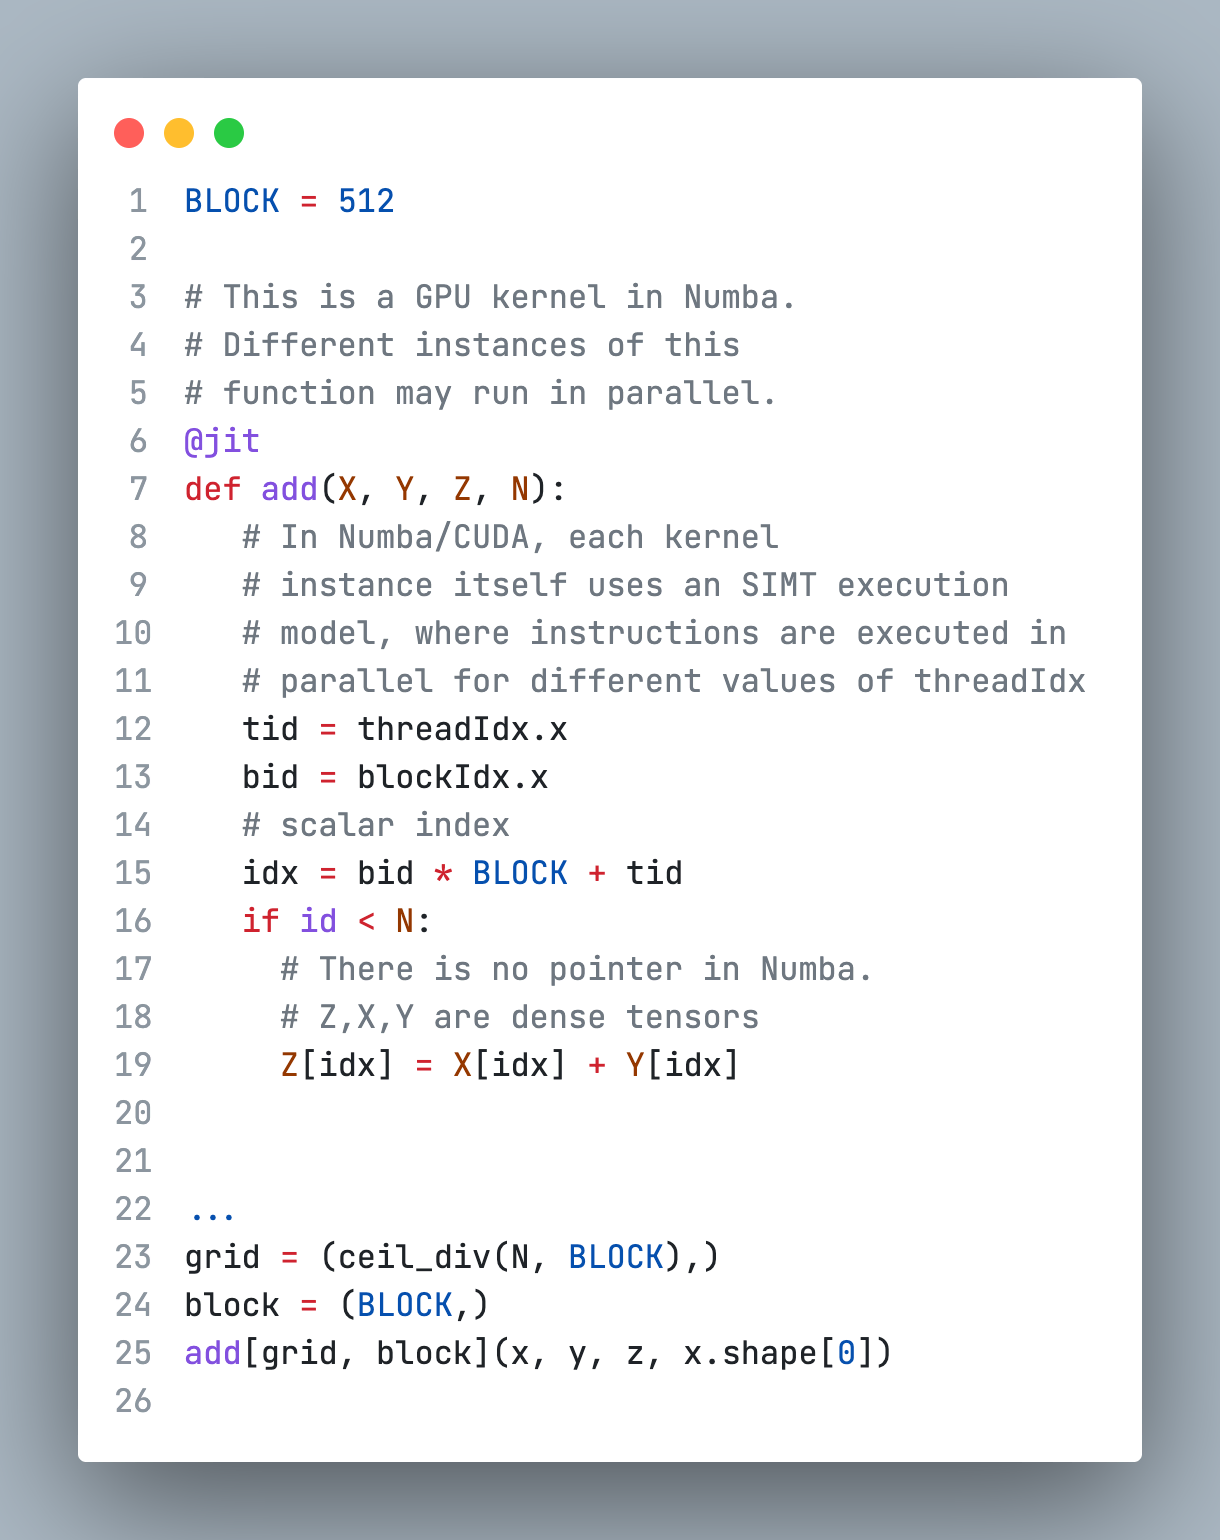
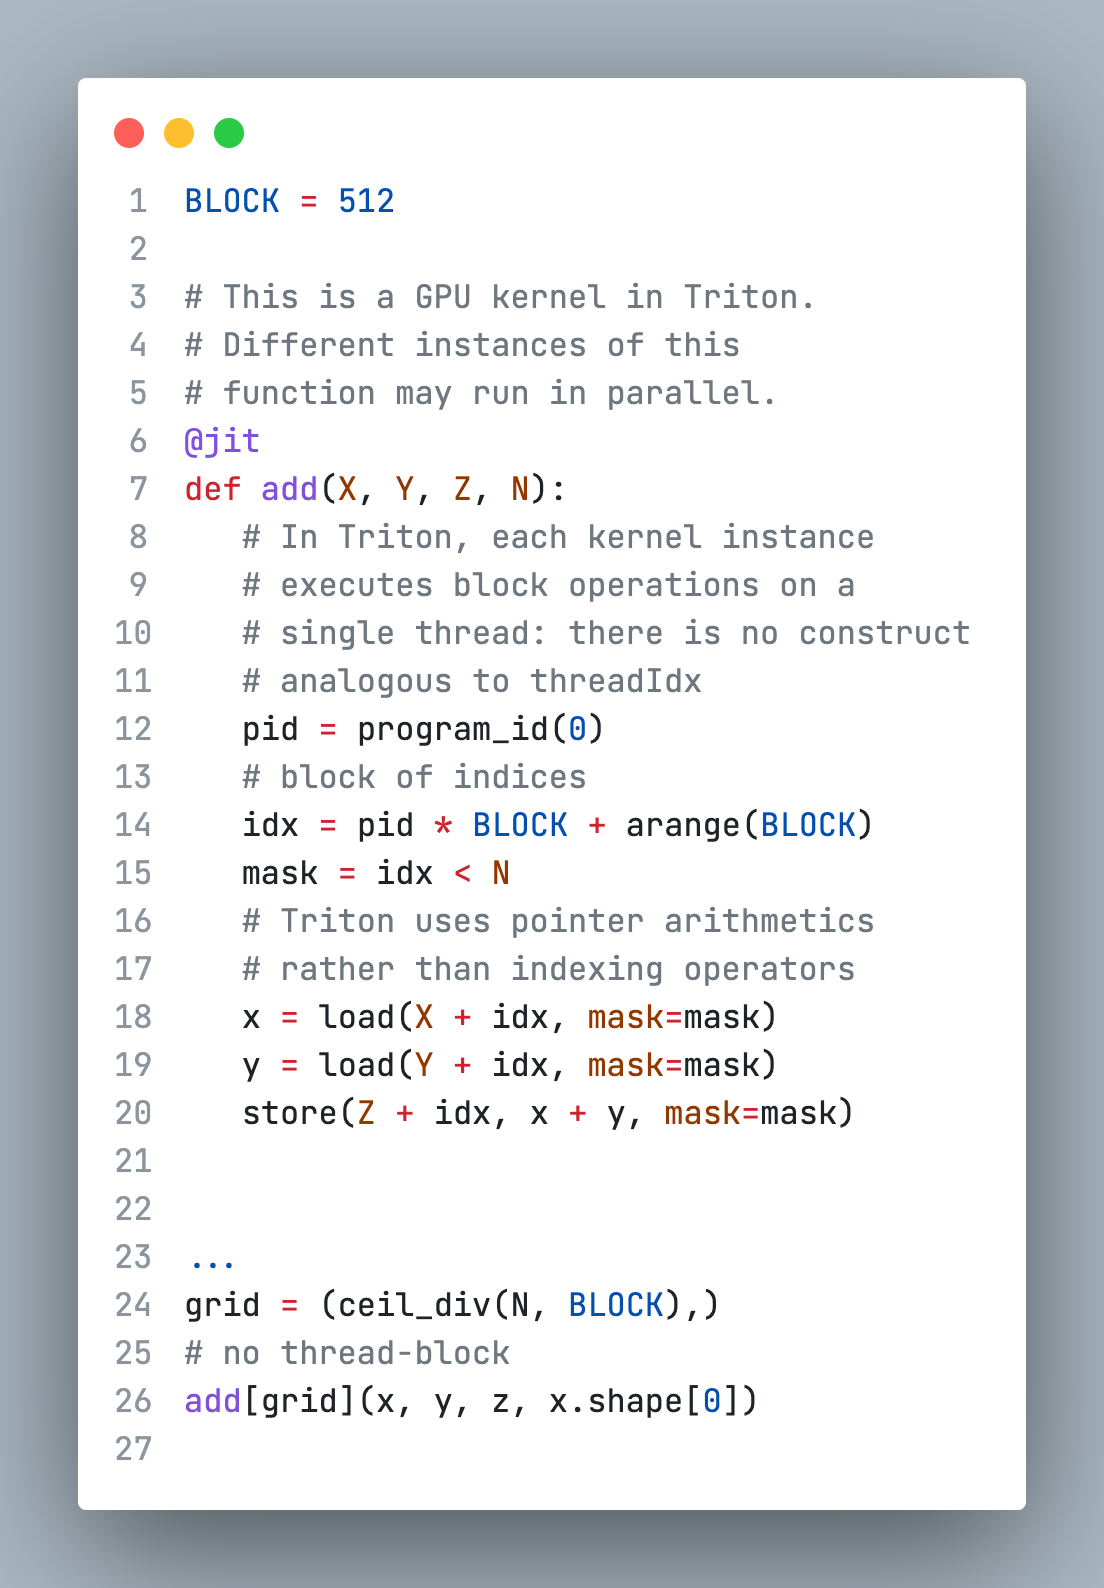
Triton is most similar to Numba, where kernels are defined as decorated Python functions and launched concurrently with different program_ids on a grid of so-called instances. However, there are key differences: Triton exposes intra-instance parallelism via operations on blocks, rather than a Single Instruction, Multiple Thread (SIMT)1 execution model.
In this way, Triton effectively abstracts away all issues related to concurrency within CUDA thread blocks (e.g. memory coalescing, thread synchronization, shared memory conflicts).
Here are vector addition examples using Numba and Triton:
| Numba | Triton |
|---|---|
 |  |
In this example, we can see that Numba/CUDA launches a kernel which executes with different threadIdx values. However, the Triton kernel executes block operations on a single thread.
Additionally, Triton will support not only Nvidia CUDA but also AMD and Intel GPUs through MLIR. This is important for democratizing Deep Learning.
How to install
You can follow the official documentation to install Triton. However, there are a few things that need extra attention.
We recommend installing Triton from source, as it is under active development. You’ll need the nightly build to obtain new features.
Before installing Triton, you must install PyTorch first. To be compatible with the latest Triton version, install the PyTorch nightly build as well.
Then use the following commands to install the Triton Python package from source:
git clone https://github.com/openai/triton.git;
cd triton/python;
pip install cmake; # build-time dependency
pip install -e .
If you encouter errors like this
/workspace/triton/lib/Target/LLVMIR/LLVMIRTranslation.cpp:40:10: fatal error: 'filesystem' file not found          40
#include <filesystem>
         ^~~~~~~~~~~~
1 error generated.
lib/Target/LLVMIR/CMakeFiles/obj.TritonLLVMIR.dir/build.make:78: recipe for
target 'lib/Target/LLVMIR/CMakeFiles/obj.TritonLLVMIR.dir/LLVMIRTranslation.cpp.o' failed
This is because your gcc version is 6.0, which doesn’t support C++17. You’ll need to update gcc/g++ and set it in the pip command:
apt update -y
apt install gcc-9 g++-9

export CC=gcc-9
export CXX=g++-9
After waiting for compilation to finish, you can test the installation by running the unit tests:
pip install -e '.[tests]'
pytest -vs test/unit/
vector-add example
Let’s end up first tutorial with a simple example, vector addition.
First of all, let’s see how to implement add kernel in Triton.
@triton.jit
def add_kernel(
    x_ptr,  # *Pointer* to first input vector.
    y_ptr,  # *Pointer* to second input vector.
    output_ptr,  # *Pointer* to output vector.
    n_elements,  # Size of the vector.
    BLOCK_SIZE: tl.constexpr,  # Number of elements each program should process.
                 # NOTE: `constexpr` so it can be used as a shape value.
):
    # There are multiple 'programs' processing different data. We identify which program
    # we are here:
    pid = tl.program_id(axis=0)  # We use a 1D launch grid so axis is 0.
    # This program will process inputs that are offset from the initial data.
    # For instance, if you had a vector of length 256 and block_size of 64, the programs
    # would each access the elements [0:64, 64:128, 128:192, 192:256].
    # Note that offsets is a list of pointers:
    block_start = pid * BLOCK_SIZE
    offsets = block_start + tl.arange(0, BLOCK_SIZE)
    # Create a mask to guard memory operations against out-of-bounds accesses.
    mask = offsets < n_elements
    # Load x and y from DRAM, masking out any extra elements in case the input is not a
    # multiple of the block size.
    x = tl.load(x_ptr + offsets, mask=mask)
    y = tl.load(y_ptr + offsets, mask=mask)
    output = x + y
    # Write x + y back to DRAM.
    tl.store(output_ptr + offsets, output, mask=mask)
A kernel function in Triton needs to be decorated with triton.jit. The term “program” can be thought of as analogous to a CUDA block. However, unlike CUDA blocks which usually have multiple threads, a Triton program runs on a single thread. BLOCK_SIZE represents the block of data that needs to be processed by this thread.
pid identifies the unique ID of the program along the specific axis(0 for 1D launch grid). This is similar to CUDA’s blockIdx.
We can use pid * BLOCK_SIZE to calculate the starting index of the input array for each instance. If BLOCK_SIZE is 32, the first instance (pid=0) will start at index 0, and second (pid=1) at index 32.
block_start + tl.arange(0, BLOCK_SIZE) computes the actual array indices each instance operates on. Then masks = offsets < n_elements ensure the read/write does not go out of bounds.
tl.load transfer elements from input array into local memory. x_ptr + offsets calculates the indices in input array for each instance, and mask prevents out-of-bound access.
output = x + y performs the computation on the loaded data blocks.
tl.store can writes the result back to the output array, similar to tl.load.
We can declare a function to execute the kernel. First allocate the output tensor, next enqueue the kernel with appropriate grid/block sizes.
def add(x: torch.Tensor, y: torch.Tensor):
    # We need to preallocate the output.
    output = torch.empty_like(x)
    assert x.is_cuda and y.is_cuda and output.is_cuda
    n_elements = output.numel()
    # In this case, we use a 1D grid where the size is the number of blocks:
    grid = lambda meta: (triton.cdiv(n_elements, meta['BLOCK_SIZE']),)
    # NOTE:
    add_kernel[grid](x, y, output, n_elements, BLOCK_SIZE=1024)
    # running asynchronously at this point.
    return output
The grid lambda defines the launch configuration, which is analogous to CUDA grids. Functions decorated with triton.jit can be indexed with a launch grid to obtain a callable GPU kernel.
Finally, we can simply test the kernel’s correctness by comparing to pytorch.
torch.manual_seed(0)
size = 98432
x = torch.rand(size, device='cuda')
y = torch.rand(size, device='cuda')
output_torch = x + y
output_triton = add(x, y)
print(output_torch)
print(output_triton)
print(
    f'The maximum difference between torch and triton is '
    f'{torch.max(torch.abs(output_torch - output_triton))}'
)
You can also benchmark this add kernel follow the official tutorial. There is enough content already, so benchmarking will be left to the next chapter.
Reference
- https://www.reddit.com/r/MachineLearning/comments/ezx202/p_triton_an_opensource_language_and_compilers_for/
- https://triton-lang.org/main/index.html
- Triton: An Intermediate Language and Compiler for Tiled Neural Network Computations
- Introducing Triton: Open-source GPU programming for neural networks