Table of contents
Open Table of contents
Introduction
梯度的计算对于各类基于梯度下降的优化方法来说非常重要,其中应用最为广泛的便是目前非常流行的神经网络中的训练,而对于深度神经网络来说,手工求解等各类求解梯度的方法非常繁琐同时也难以计算,如何有效求解梯度对于高效地训练网络来说也变得异常重要。
在这篇文章中会介绍一下目前主流深度学习框架中都在使用的自动微分技术,通过这个技术可以实现高效的梯度求解,使得大规模的深度网络训练成为可能。
什么是自动微分(AutoDiff)?
一般来说在计算机中使用程序求解梯度有三种方式,分别是自动微分,数值微分和符号微分,下面先简单介绍一下数值微分和符号微分,以此来引出自动微分。
数值微分 主要使用的方法是有限差分,因为导数可以通过下面的极限来定义
所以在计算机中可以通过取一个非常小的 h 来模拟这个过程,但是通过公式也可以看出,数值微分在使用的时候计算代价非常高,因为每次计算微分的时候都需要进行前向计算,同时也存在数值稳定性的问题。 虽然不能直接在大规模计算中用来求导,不过它也有一定的作用,就是可以用来测试单个 Op 的导数是不是正确的,通常误差范围取值 1e-6.
符号微分 主要通过符号微分的计算来推导数学公式,典型的代表就是 mathematica。这种计算方法虽然在数学上是严格正确的,但是会导致结果计算非常复杂且冗余,比如下面对两层的 soft relu 求导公式就已经非常复杂了

同时有一些计算过程会被反复的重新计算,并不适合用在复杂的神经网络中,我们的目标并不是求每一个参数梯度的公式,而是系统通过计算过程获得最终的数值。
自动微分 是通过程序来自动求解梯度的一种通用方法,他不像数值微分在每次计算梯度的时候需要重复进行前向计算,也不像符号微分一样在计算梯度的时候需要完整推导数学公式,其会将一个复杂的计算转换成一系列 primitive 算子,然后依次对这个中间的单个算子进行梯度求解的过程,下面我们开始讲解今天的主角 AutoDiff。
AutoDiff 的数学原理
AutoDiff 在数学上有两种计算方式,分别是 forward mode 和 reverse mode,下面我们分别通过例子来讲一下这两种 mode 是如何进去梯度求解的。
AutoDiff 中 forward mode 的实现原理
forward mode 在计算梯度的时候会从最开始往后进行计算,比如为了获得 y 对 的导数,会不断计算中间变量 对 的导数,然后使用链式法则最后就可以获得 y 对 的导数,下面的例子 可以清楚的描述这个过程,左边是通过 计算 y 的过程,右边是通过 forward mode 计算 y 对 导数的过程

首先设定 ,接着不断计算 对 的导数即可,中间可以通过链式法则进行计算,比如 ,而之前已经求了 的结果,所以只需要计算当前一步的导数即可。
如果用数学语言来描述这个过程,就是需要计算 f 的 Jacobian 矩阵,其中 表示由 n 个独立的输入变量 映射到 m 个相关的输出变量 。对于上面这种特殊的情况,可以把每一次 AutoDiff 的 foward pass 看成是将变量 x 的其中一个分量 其他的分量设为 0 的一次推导。所以当 时,forward pass 非常高效,因为所有需要计算的偏导只需要进行一次 forward pass 即可。
AutoDiff 中 reverse mode 的实现原理
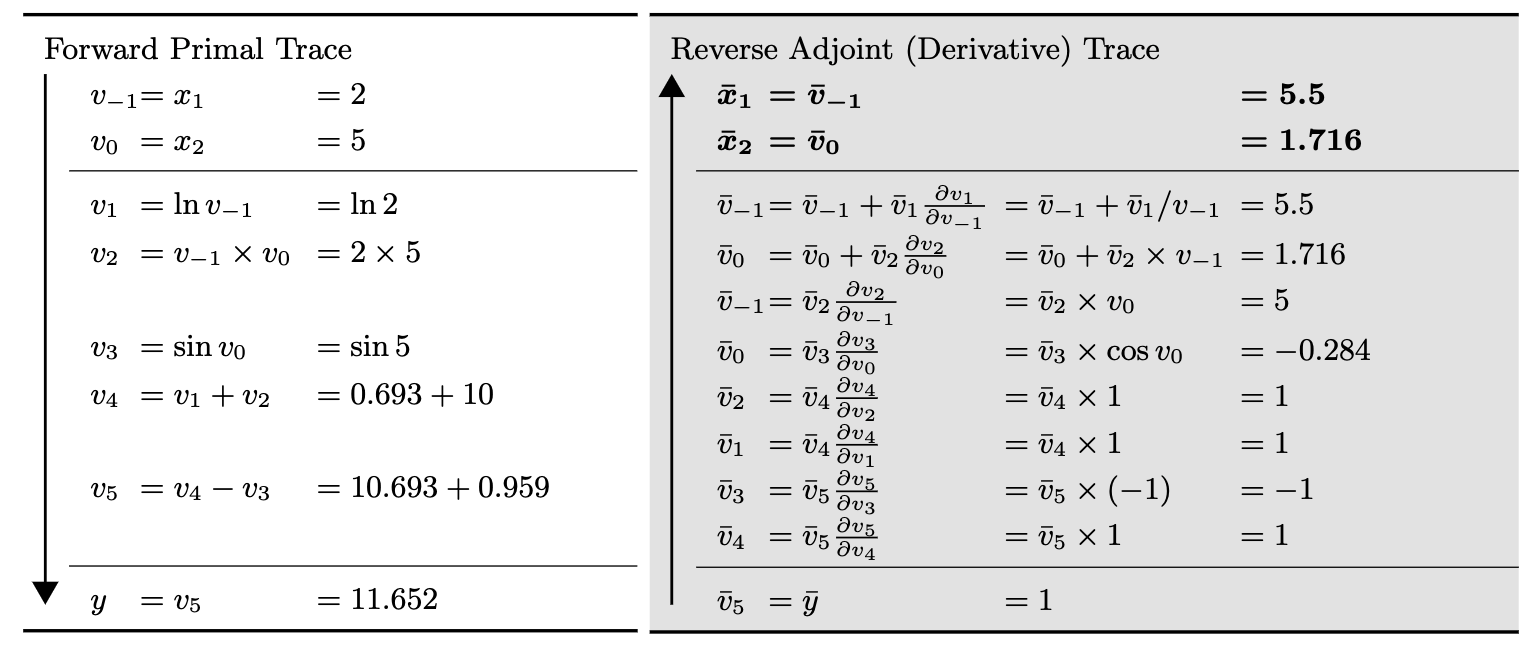
reverse mode 和他的名字一样,会从后往前计算导数,同样以刚才的例子 来描述这个过程,左边是通过 计算 f 的过程,右边则是通过 reverse mode 计算 f 对 导数的过程

左边的计算流程是一样的,但是在求导数的过程却是相反的,设定 ,那么 ,继续求 ,同样通过链式法则只需要计算当前一步的导数即可
如果用数学语言来描述这个过程,就是需要计算 f 的 Jacobian 矩阵,其中 。同样对于上面这种情况,每一次 autodiff 的 backward pass 可以看成是将因变量 y 的其中一个分量 其他分量设为 0 的一次推导。所以当 时,reverse mode 非常高效,因为所有需要计算的偏导只需要进行一次 reverse pass 即可。
而我们知道在深度学习中 loss 一般都是一个标量,而参数一般都是一个高维张量,所以 可以表示绝大多数深度学习模型的情况,通过上面的分析可以看出 reverse mode 效率更高,这也是为什么深度学习都是选择 reverse mode 进行梯度计算的原因,这也是反向传播算法的由来。
AutoDiff 的代码实现
上面讲解了自动微分的数学原理,最终仍然需要使用程序进行实现才能真正应用到深度学习中,从上面可以看到 reverse AutoDiff 更加适用于机器学习中,下面我们来讲讲 reverse AutoDiff 的代码实现。
伪代码讲解

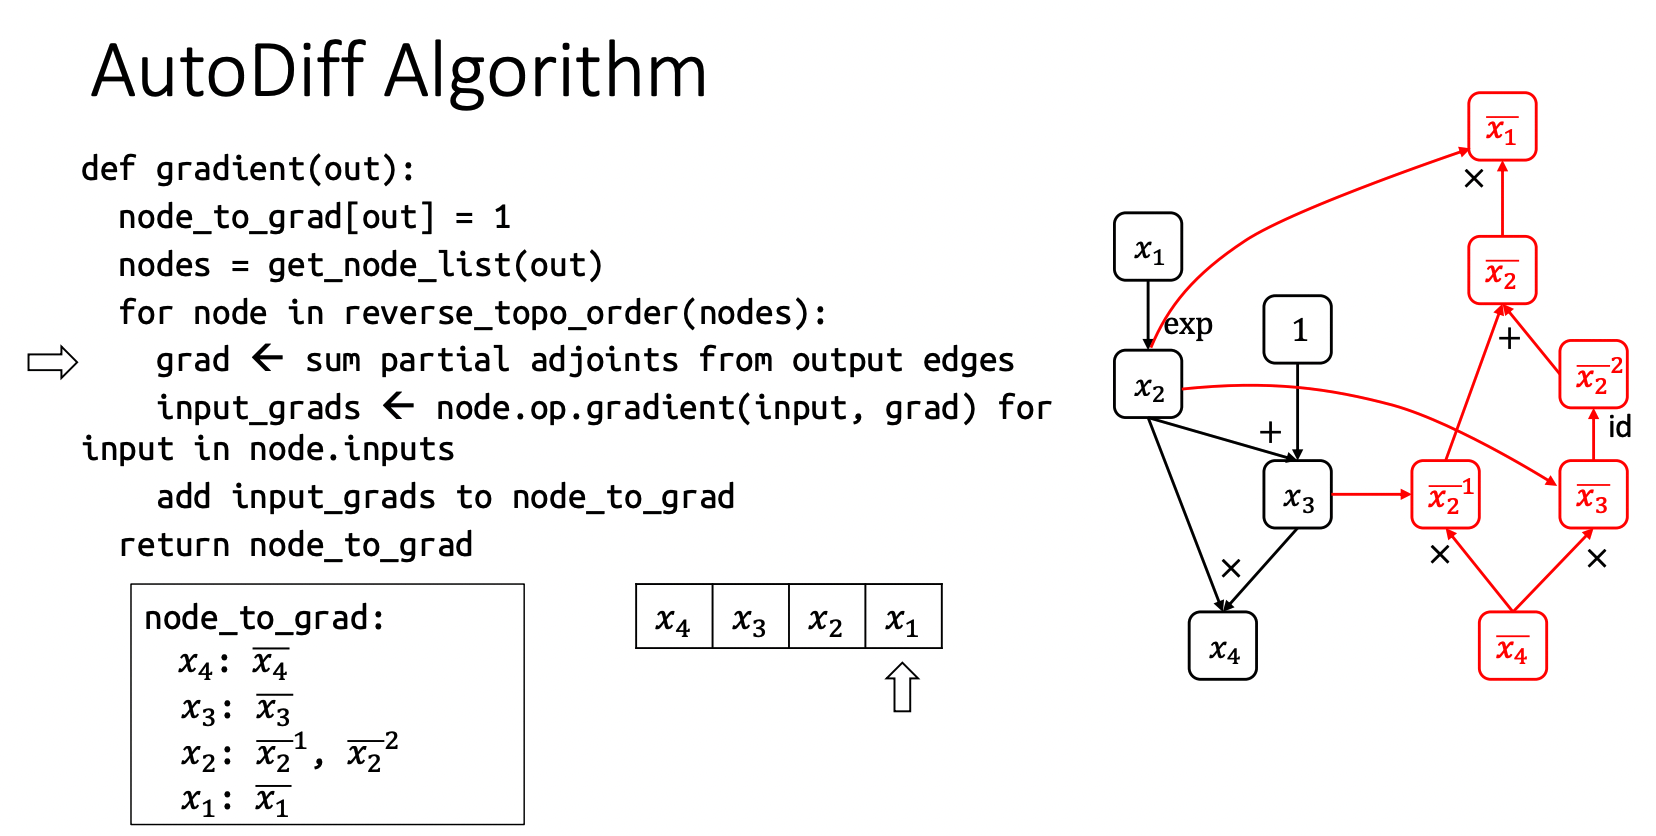
上面的伪代码描述了 AutoDiff 的整体计算逻辑,在代码实现中使用图这种数据结构来表示计算过程,不管是前向计算还是反向计算都可以通过图中的边和节点来描述,一个节点可以表示一种运算,而节点的入边表示这种运算需要的所有输入,出边表示该节点被其他节点所消费,建立好计算图之后,最终可以通过输入数据来计算最终需要的结果,下面我们以上面计算图为例详细描述一下整个流程。
上面左边的黑色子图表示 forward pass,右边的红色子图是 backward pass。
- 如果设定 ,那么 ;
- 接着计算 在 forward pass 中输入节点 对应的梯度,其中 ,所以可以看到上面 的输入节点是 和 ;
- 同理接着计算 ,因为还有一部分 的梯度由 提供,所以可以将当前 梯度写为 加以区分;
- 然后计算 在 forward pass 中输入节点 的梯度,,最终可以得到 ;
- 最后可以计算 的输入节点 的梯度得到 ,这样也就完成了 backward pass 的构图。
通过图将流程描述清楚了,左边给出了伪代码,可以简单解释一下。
node_to_grad即为要求的所有节点的梯度,首先设定 out 的梯度为 1,即 ;get_node_list(out)可以取得 out 在 forward pass 中的所有节点序列,在上图中计算的所有节点序列为 ;reverse_topo_order(nodes)求这些节点的反向拓扑排序,即对于 forward pass 这样的有向图,按照节点出现的先后顺序进行反向排序,上面的例子在排序完成之后是 这样的顺序,排序后便可进行 reverse mode AutoDiff;- 接着对所有的节点进行遍历,首先遍历到 ,然后计算 ,接着计算 的所有输入节点的梯度,即 ,然后把他们加入到
node_to_grad当中等待后续的使用; - 然后遍历到 ,计算其梯度 ,接着计算输入节点梯度 ,然后将其加入
node_to_grad当中; - 接着遍历到 ,
sum partial adjoints即为 这样获得了 的梯度,然后计算器输入节点 的梯度就完成了整个的计算过程;
Python 代码实现
首先需要对图中的节点进行定义,这个节点中需要包含输入节点,以及他们的具体运算,也就是 Op。
class Node(object):
    """Node in a computation graph."""
    def __init__(self):
        """Constructor, new node is indirectly created by Op object __call__ method.

            Instance variables
            ------------------
            self.inputs: the list of input nodes.
            self.op: the associated op object,
                e.g. add_op object if this node is created by adding two other nodes.
            self.const_attr: the add or multiply constant,
                e.g. self.const_attr=5 if this node is created by x+5.
            self.name: node name for debugging purposes.
        """
        self.inputs = []
        self.op = None
        self.const_attr = None
        self.name = ""

    def __add__(self, other):
        """Adding two nodes return a new node."""
        if isinstance(other, Node):
            new_node = add_op(self, other)
        else:
            # Add by a constant stores the constant in the new node's const_attr field.
            # 'other' argument is a constant
            new_node = add_byconst_op(self, other)
        return new_node

    def __mul__(self, other):
        """TODO: Your code here"""
        if isinstance(other, Node):
            new_node = mul_op(self, other)
        else:
            # Multiply by a constant stores the constant in the new node's const_attr field.
            new_node = mul_byconst_op(self, other)
        return new_node

    # Allow left-hand-side add and multiply.
    __radd__ = __add__
    __rmul__ = __mul__

    def __str__(self):
        """Allow print to display node name."""
        return self.name

    __repr__ = __str__
对于每一个 node,建立上面的类,其中 self.inputs 记录了这个节点计算需要的输入节点,self.op 表示需要对这些输入进行的运算,__add__ 和 __mul__ 这两种 magic method 可以使得两个节点 node1 和 node2 可以支持 node1 + node2 和 node1 * node2 的操作。
接着需要定义具体的 Op,首先定义一个基类 Op,所有实际的 Op 都需要继承这个基类,在 Op 中需要包含 forward 和 backward 两种运算。
class Op(object):
    """Op represents operations performed on nodes."""
    def __call__(self):
        """Create a new node and associate the op object with the node.

        Returns
        -------
        The new node object.
        """
        new_node = Node()
        new_node.op = self
        return new_node

    def compute(self, node, input_vals):
        """Given values of input nodes, compute the output value.
        Parameters
        ----------
        node: node that performs the compute.
        input_vals: values of input nodes.
        Returns
        -------
        An output value of the node.
        """
        raise NotImplementedError

    def gradient(self, node, output_grad):
        """Given value of output gradient, compute gradient contributions to each input node.
        Parameters
        ----------
        node: node that performs the gradient.
        output_grad: value of output gradient summed from children nodes' contributions
        Returns
        -------
        A list of gradient contributions to each input node respectively.
        """
        raise NotImplementedError


class AddOp(Op):
    """Op to element-wise add two nodes."""
    def __call__(self, node_A, node_B):
        new_node = Op.__call__(self)
        new_node.inputs = [node_A, node_B]
        new_node.name = "(%s+%s)" % (node_A.name, node_B.name)
        return new_node

    def compute(self, node, input_vals):
        """Given values of two input nodes, return result of element-wise addition."""
        assert len(input_vals) == 2
        return input_vals[0] + input_vals[1]

    def gradient(self, node, output_grad):
        """Given gradient of add node, return gradient contributions to each input."""
        return [output_grad, output_grad]
上面在基类 Op 中定义了 __call__ 这个 magic method,通过 op() 会调用 __call__(),会创建一个新的 node,同时将 node 的 op 设为为当前 op。
另外以一个实际的 AddOp 为例,__call__ 方法需要输入为 node_A, node_B,首先调用 Op.__call__(self) 即先调用基类 Op 的 __call__ 方法,接着再将 node_A, node_B 设定为这个节点的输入节点。
compute 是给定输入节点的值,计算输出结果,gradient 为给定当前节点的梯度,返回输入节点的梯度,这里因为是简单的 add 操作,所以梯度就为当前节点,下面可以看看一个更复杂的矩阵乘法 Op,逻辑是类似的,只是 compute 和 gradient 计算会更加复杂。
class MatMulOp(Op):
    """Op to matrix multiply two nodes."""
    def __call__(self, node_A, node_B, trans_A=False, trans_B=False):
        """Create a new node that is the result a matrix multiple of two input nodes.
        Parameters
        ----------
        node_A: lhs of matrix multiply
        node_B: rhs of matrix multiply
        trans_A: whether to transpose node_A
        trans_B: whether to transpose node_B
        Returns
        -------
        Returns a node that is the result a matrix multiple of two input nodes.
        """
        new_node = Op.__call__(self)
        new_node.matmul_attr_trans_A = trans_A
        new_node.matmul_attr_trans_B = trans_B
        new_node.inputs = [node_A, node_B]
        new_node.name = "MatMul(%s,%s,%s,%s)" % (node_A.name, node_B.name, str(trans_A), str(trans_B))
        return new_node

    def compute(self, node, input_vals):
        """Given values of input nodes, return result of matrix multiplication."""
        """TODO: Your code here"""
        assert len(input_vals) == 2
        if node.matmul_attr_trans_A:
            input_vals[0] = np.transpose(input_vals[0])
        if node.matmul_attr_trans_B:
            input_vals[1] = np.transpose(input_vals[1])

        return np.dot(input_vals[0], input_vals[1])

    def gradient(self, node, output_grad):
        """Given gradient of multiply node, return gradient contributions to each input.

        Useful formula: if Y=AB, then dA=dY B^T, dB=A^T dY
        """
        """TODO: Your code here"""
        if node.matmul_attr_trans_A:
            dA = matmul_op(node.inputs[1], output_grad, trans_B=True)
        else:
            dA = matmul_op(output_grad, node.inputs[1], trans_B=True)

        if node.matmul_attr_trans_B:
            dB = matmul_op(output_grad, node.inputs[0], trans_A=True)
        else:
            dB = matmul_op(node.inputs[0], output_grad, trans_A=True)
        return [dA, dB]
如果完成了所有 primitive Op 的构建,那么复杂的计算也可以由多个 primitive Op 构成,有了 Op 的计算,接着可以开始构建计算图了。
class Executor:
    """Executor computes values for a given subset of nodes in a computation graph."""
    def __init__(self, eval_node_list):
        """
        Parameters
        ----------
        eval_node_list: list of nodes whose values need to be computed.
        """
        self.eval_node_list = eval_node_list

    def run(self, feed_dict):
        """Computes values of nodes in eval_node_list given computation graph.
        Parameters
        ----------
        feed_dict: list of variable nodes whose values are supplied by user.
        Returns
        -------
        A list of values for nodes in eval_node_list.
        """
        node_to_val_map = dict(feed_dict)
        # Traverse graph in topological sort order and compute values for all nodes.
        topo_order = find_topo_sort(self.eval_node_list)
        """TODO: Your code here"""
        for node in topo_order:
            if isinstance(node.op, PlaceholderOp):
                continue
            input_vals = [node_to_val_map[input_node] for input_node in node.inputs]
            node_val = node.op.compute(node, input_vals)
            node_to_val_map[node] = node_val

        # Collect node values.
        node_val_results = [node_to_val_map[node] for node in self.eval_node_list]
        return node_val_results
Executor 首先将所有需要求值的 node 收集到 eval_node_list 当中,不需要求值的 node 最终的结果并不需要保留,可以起到节约内存的目的,接着在 run 中计算 forward pass,通过对有向图进行拓扑排序可以获得节点的先后顺序,接着遍历每一个节点,对于 placeholder 直接跳过,因为其直接通过用户从 feed_dict 中提供,比如最上面例子中的 。
对于其他节点,遍历他的输入节点,通过 node_to_val_map[input_node] 获得其值,然后将值传入到 node.op.compute 中进行计算得到节点的值 node_val,同时将其存入 node_to_val_map 中,通过不断计算最终可以获得所有节点的值,将其存在 node_val_results 中。
有了 forward pass 的构图后便可以开始进行 reverse AutoDiff 的构图,代码如下
def gradients(output_node, node_list):
    """Take gradient of output node with respect to each node in node_list.

    Parameters
    ----------
    output_node: output node that we are taking derivative of.
    node_list: list of nodes that we are taking derivative wrt.

    Returns
    -------
    A list of gradient values, one for each node in node_list respectively.

    """

    # a map from node to a list of gradient contributions from each output node
    node_to_output_grads_list = {}
    # Special note on initializing gradient of output_node as oneslike_op(output_node):
    # We are really taking a derivative of the scalar reduce_sum(output_node)
    # instead of the vector output_node. But this is the common case for loss function.
    node_to_output_grads_list[output_node] = [oneslike_op(output_node)]
    # a map from node to the gradient of that node
    node_to_output_grad = {}
    # Traverse graph in reverse topological order given the output_node that we are taking gradient wrt.
    reverse_topo_order = reversed(find_topo_sort([output_node]))

    for node in reverse_topo_order:
        # Sum partial adjoints from output edges to get output_grad
        output_grad = zeroslike_op(node_to_output_grads_list[node][0])
        for partial_grad in node_to_output_grads_list[node]:
            output_grad = output_grad + partial_grad

        # Get grad for input in node.inputs
        input_grads = node.op.gradient(node, output_grad)
        for i, input_node in enumerate(node.inputs):
            if input_node not in node_to_output_grads_list:
                node_to_output_grads_list[input_node] = [input_grads[i]]
            else:
                node_to_output_grads_list[input_node].append(input_grads[i])

        node_to_output_grad[node] = output_grad

    # Collect results for gradients requested.
    grad_node_list = [node_to_output_grad[node] for node in node_list]
    return grad_node_list
整体思路和之前的伪代码一致:
- 首先通过
node_to_output_grads_list[output_node] = [oneslike_op(output_node)]将输出节点的梯度设为 1,因为我们约定计算的梯度是reduce_sum(output_node)对于output_node是向量的情况,这也是通常机器学习中 loss 的情况; - 接着找到反向的拓扑排序之后,对所有的节点进行遍历,然后先通过
zeroslike_op初始化一个全 0 node 用于后续求和梯度,最终output_grad即为 loss 对当前 node 的梯度; - 然后需要求在 forward pass 下当前 node 的
input_node的梯度,因为这一步就是一个 primitive 的计算,所以直接调用node.op.gradient(node, output_grad)即可获得input_node的梯度,每个 op 的 gradient 都由之前我们定义每一个 op 时候手工已经写好了; - 接着将
input_node加入到node_to_output_grads_list中而不是node_to_output_grad,因为这个节点可能也是其他节点的input_node,所以可能存在多个梯度,需要完成了所有梯度的计算后再求和才是最终的梯度; - 最后将这个当前 node 的梯度放入到
node_to_output_grad用于后续的计算,因为当前 node 已经不可能是其他节点的input_node(拓扑排序),所以这里计算得到的梯度是完整的;
通过上面的方式只需要反向遍历一次所有的 node 便可构建好反向图,同时输入实际的数据之后就可以得到前向的计算结果和反向的梯度结果,只是这里要注意在构建反向图时,所有的计算也是 node 之间的计算,两个 node 的求和 x+y 其实调用的是 __add__ 即内部调用的实际是 add_op, add_byconst_op。
Ending
这篇文章介绍了自动微分的基本概念,然后分别从数学和代码实现的角度出发解释了自动微分的原理,也给了一个自动微分的代码示例,不过自动微分是一个非常复杂的系统,这里展示的只是冰山一角,还有很多内容可以探索,比如如何进行高效的高阶导计算等等,感兴趣的同学可以从下面的参考链接中继续学习自动微分相关的知识。
最后希望这篇文章能够帮助到你们,如果你有任何建议和问题欢迎在评论去留言。